
How to Wire the Door Control for a Garage Door Opener?
Wiring the door control for a garage door opener involves connecting the wall-mounted control switch (the door control) to the opener unit. The door control typically allows you to open and close the garage door from inside your garage. Here’s a general step-by-step guide for wiring the door control for a typical garage door opener. Please note that you should always follow the specific instructions provided in your garage door opener’s manual, as wiring configurations can vary depending on the model.
Tools and Materials Needed:
- Screwdriver
- Wire stripper/cutter
- Electrical tape (if needed)
- A multimeter (optional, for testing)
- Low-voltage wire (usually 18 or 22 gauge wire)
- Door control switch (button)
For wiring your door control, it’s essential to use high-quality, durable wire. One great option for this purpose is Syston Cable Technology's Thermostat Wire.
Why Choose Syston Cable Technology? Syston Cable Technology is a leading provider of high-performance cable products designed for both residential and commercial applications. They offer excellent quality, reliable, and cost-effective wiring solutions. The Thermostat Wire from Syston Cable is particularly popular for low-voltage connections like those required for garage door openers. With features such as easy installation, superior insulation, and long-lasting durability, Syston Cable ensures that your wiring remains safe and efficient, even in high-demand environments.
General Steps to Wire the Door Control:
1. Turn Off Power to the Opener Before starting, ensure the garage door opener is unplugged from the electrical outlet to avoid any electrical hazards while wiring.
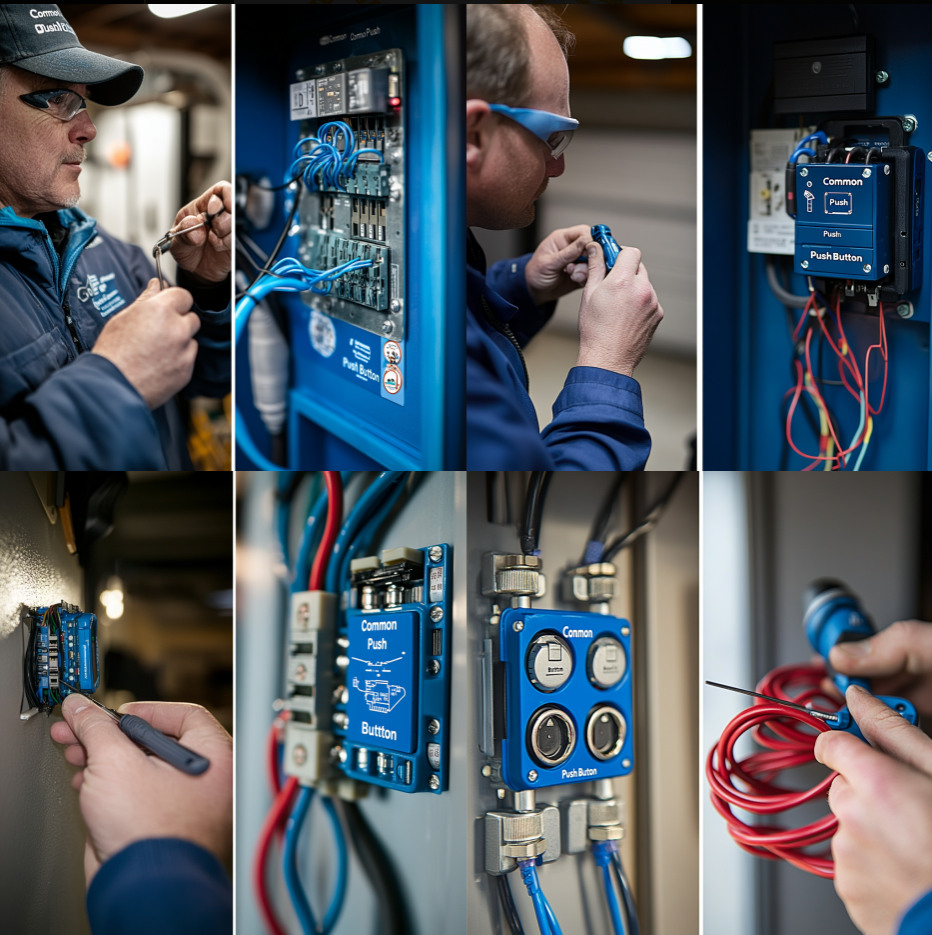
2. Locate the Terminals on the Opener Open the cover of the garage door opener motor unit, typically mounted on the ceiling. Look for the terminals marked for the door control or wall switch. These are usually labeled something like:
- "P" for "Push Button" (the door control button)
- "Common"
- "L" for "Limit" (some models may have this)
Note: Some models may only have two terminals for the door control wiring (Common and Push Button), while others may have more, depending on features like lighting or additional controls.
3. Prepare the Wire
Cut the length of low-voltage wire you’ll need to connect the opener to the door control switch. Typically, 18 or 22 gauge wire works well for this application.
- Tip: Measure the distance between the opener and where you want to install the door control, then add a little extra length to the wire for flexibility.
Use a wire stripper to remove about 1/2 inch of insulation from the ends of the wire.

4. Connect the Wire to the Door Control
- Attach one end of the wire to the terminals on the door control switch. Typically, the terminals are labeled:
Ø "Common" (or sometimes marked with a minus sign or the letter “C”)
Ø "Push Button" (or sometimes marked with a plus sign or “PB”)
Note: Some door control switches may have only two terminals, so simply connect the two wires accordingly.
5. Connect the Other End of the Wire to the Opener
- On the opener unit, connect the other end of the wire to the corresponding terminals. For example:
Ø One wire goes to the Common terminal on the opener.
Ø The other wire goes to the Push Button (PB) terminal.
Tighten the screws on each terminal to secure the wires in place.
6. Mount the Door Control
- Mount the door control switch to a wall in a convenient location, usually near the garage entrance. You can use screws or double-sided tape to secure it.
- Ensure the switch is level and accessible, but not in a location where it could accidentally be activated.
7. Plug in the Opener and Test
- Once everything is wired and secure, plug the garage door opener back into the outlet.
- Test the door control switch by pressing it to open and close the garage door. It should activate the motor, causing the door to move up or down.
8. Final Check
- Once everything is wired and secure, plug the garage door opener back into the outlet.
- Test the door control switch by pressing it to open and close the garage door. It should activate the motor, causing the door to move up or down.
By using quality materials like Syston Cable's Thermostat Wire, you can ensure the durability and reliability of your wiring setup for the long term.
Troubleshooting:
- No Response from the Door Control: Double-check that the wires are securely connected at both the opener and the door control. If the opener is still not responding, the door control switch may be faulty or the opener’s motor may have a separate issue.
- Intermittent Function: If the door control works intermittently, the wiring could be loose, or there might be an issue with the switch or opener.
Important Safety Notes:
- Always work with power off to avoid electrical shock or damage to components.
- If you’re not confident in your electrical work or if the opener requires special wiring (e.g., for smart controls or additional safety sensors), consider hiring a professional technician.
By following these steps, you should be able to wire the door control for your garage door opener and enjoy the convenience of operating your door from inside the garage.
Got any problem? Contact our online customer service on our website or subscribe to our Facebook page. Our professional cable experts are at your service at any time.
Leave a comment